
Tascam DR-05x setup instructions for Court Reporter use. The page numbers referenced are from the Tascam DR-05x manual
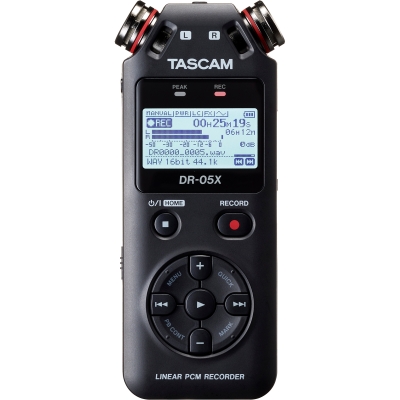
Descriptions of buttons (page 6):
white square = ON/OFF and HOME
> = Play and “ENTER”
+ = Raise the level
– = Lower the level
|<< = Move cursor left; go back one track; rewind
>>| = More cursor right; go forward one track; fast-forward
red o = record button
Steps to setup recorder for maximum results when Court Reporting:
1 – Unpack recorder and install the memory card and batteries per manufacturer’s instructions (Page 7). Note, if you prefer to use rechargeable batteries, you can purchase them here
2 – Turn recorder “on” by holding down the HOME button for a few seconds (until a message on the screen appears)
3 – Cursor is on “English” – press ENTER
4 – Enter the current date and time. Use the + and – buttons to select the year. Press >>| to move the cursor to the month and use the + or – to select the month. Press >>| to move the cursor to the day and use the + or – to select the day of the month. Press >>| to move the cursor to the hour and use the + or – to select the hour (military time). Press >>| to move the cursor to the minute and use the + or – to select the minute. No need to select the seconds. Press ENTER.
5 – The screen will say “FORMAT ERROR, FORMAT CARD”. The memory card needs to be formatted for this recorder. To do so, press ENTER, then press “MENU”. Use the + or – to select “SYSTEM”, press ENTER. Use the + or – to select “QUICK FORMAT”. Press “ENTER”, then “ENTER” again, then the >>| button.
6 – Use the + or – to select “REC SETTING”, press ENTER. Use the + or – to select “TYPE”, press ENTER. Use the + or – to select “MONO”, press HOME.
7 – Press “RECORD” one time ONLY. The REC light should be flashing. This indicated that the recorder in the “RECORD STANDBY” mode. It is not recording – it is READY to record.
8 – Press the “QUICK” button. “LEVEL MODE” is highlighted. Press ENTER. Use the + or – to select “AUTO”, press ENTER. This is VERY important as this mode will automatically adjust the recording level as needed based on the sound level of the people speaking. If they get quiet, the recorder will automatically raise the recording level. If people get too loud, the recorder will automatically lower the recording level. This will make sure that all of the speakers will be heard in the recording without any distortion.
9 – When you are ready to start recording, press “RECORD” again. The red light will stop flashing and the time on the screen will start counting up. You are now recording.
10 – When you are finished recording, press the HOME button. Press and HOLD the HOME button for a few seconds to turn off the recorder.
11 – To move your recordings from the recorder to your computer, make sure the recorder is OFF. Connect a USB cable between the recorder and a USB port on your computer. Press the HOME button to turn on the recorder. On the recorder screen, use the + or – to select “SD CARD READER”, press ENTER. Your computer may prompt you to select what you want to happen when you connect this recorder. Regardless, the computer will now see your recorder as an external disk drive. You can open Windows “FILE EXPLORER” and look for “DR-05X” under “This PC”. Click “DR-05X”, double-click the “MUSIC” folder. In this folder, you will find your recording(s). You can treat these files like any other files on your computer. Rename or delete the files here, or copy the files to a location of your choice on your computer’s hard disk. When finished, press the HOME button to turn off the recorder.
Feel free to reference the manual for advanced operations. If you have questions, please contact us for assistance.
Reviews
There are no reviews yet.